
The 2017 Rider's Manual, Maintenance Section starting on page 65 talks about maintenance, page 67 starts a table listing the items to be looked at. There was only one item with a "R"eplace and 3 items with a "L"ube, lots of "I"nspect items.
Given that there were only 5 things to adjust or Lub, I decided to perform the 500 mile service myself. We''ll the Rider's Manual only covers some of these items in enough detail to perform easily if at all. The Service Manual, which covers years 2015-17 scout and scout sixty, has everything you should know! But try to buy one at your local dealer, they seem to be in short supply. I had to get one one online at: http://www.service-shop-
Tip: Indian seems to like to use socket cap bolts, you'll need hex wrenches! This was true for the oil drain and clutch/brake lever bolts.
Oil Change -
I purchased the oil change kit from Indian, it comes with 4 quarts of 15-60w fully synthetic oil, oil filter and 2 washers. One for each drain plug, yes there are 2!I was able to drain the oil and replace the filter while the bike was on its side stand. But filling the oil to the proper level either requires a helper or a motorcycle stand. I like to work alone so Harbor Freight or Sears have great Stands, $60 to $170 bucks. Getting a stand was a good investment. Turns out lots of adjustments require you to have the bike level, very had to do by yourself.
notes:
- The oil dipstick must be screwed in, seated, to measure the oil level.
- The manual says the engine should be warm to measure oil level, not cold.
- The manual says don't over fill, I used a turkey baster to suck out a few oz of over fill! Don't return the baster to the kitchen, keep it in the garage for the next time you change the oil.
Clutch Cable Lubrication -
Both ends need to be greased. But don't try to lubricate the cable itself, manual says not to. Key to gaining access to both ends of the cable is to loosen the clutch cable adjuster bolt, which is just below the engine on the brake side. Loosen it all the way and you'll have no trouble removing the barrel ends to lub. Also note that the bolt that holds the level in is a hex bolt, there is a plastic cap that makes the top look like a round head bolt. You will likely destroy the cap when removing it! They tell me you can buy a box of them, I went to my local auto parts store and used, after modifying, toyota door panel push pins. I had to trim the length and width of the pin and an edge of the top cap but it pushed in a seated just fine. You have to retension the cable anyways so loosening it is no big deal, just do it.Brake Cable Lubrication -
Same bolt as the clutch cable, note both clutch and brake lever bolts used to have heads not hex heads! Not sure what year Indian changed to allen hex heads! Brake cable only has one end to lube.
Side Stand Lubrication -
While on the motorcycle stand I just sprayed with WD40. Seems easy to do and made the stand swing easier.
Drive Belt Tension & Alignment -
You'll need to get a belt tension gauge: amazon "Belt Tension", $25.90, check to see that it measures to 10lbs.
Belt tension, my 2017 Scout manual says 12mm at 10lbs. Looking on the web I saw numbers from 11 to 28mm! Yikes!
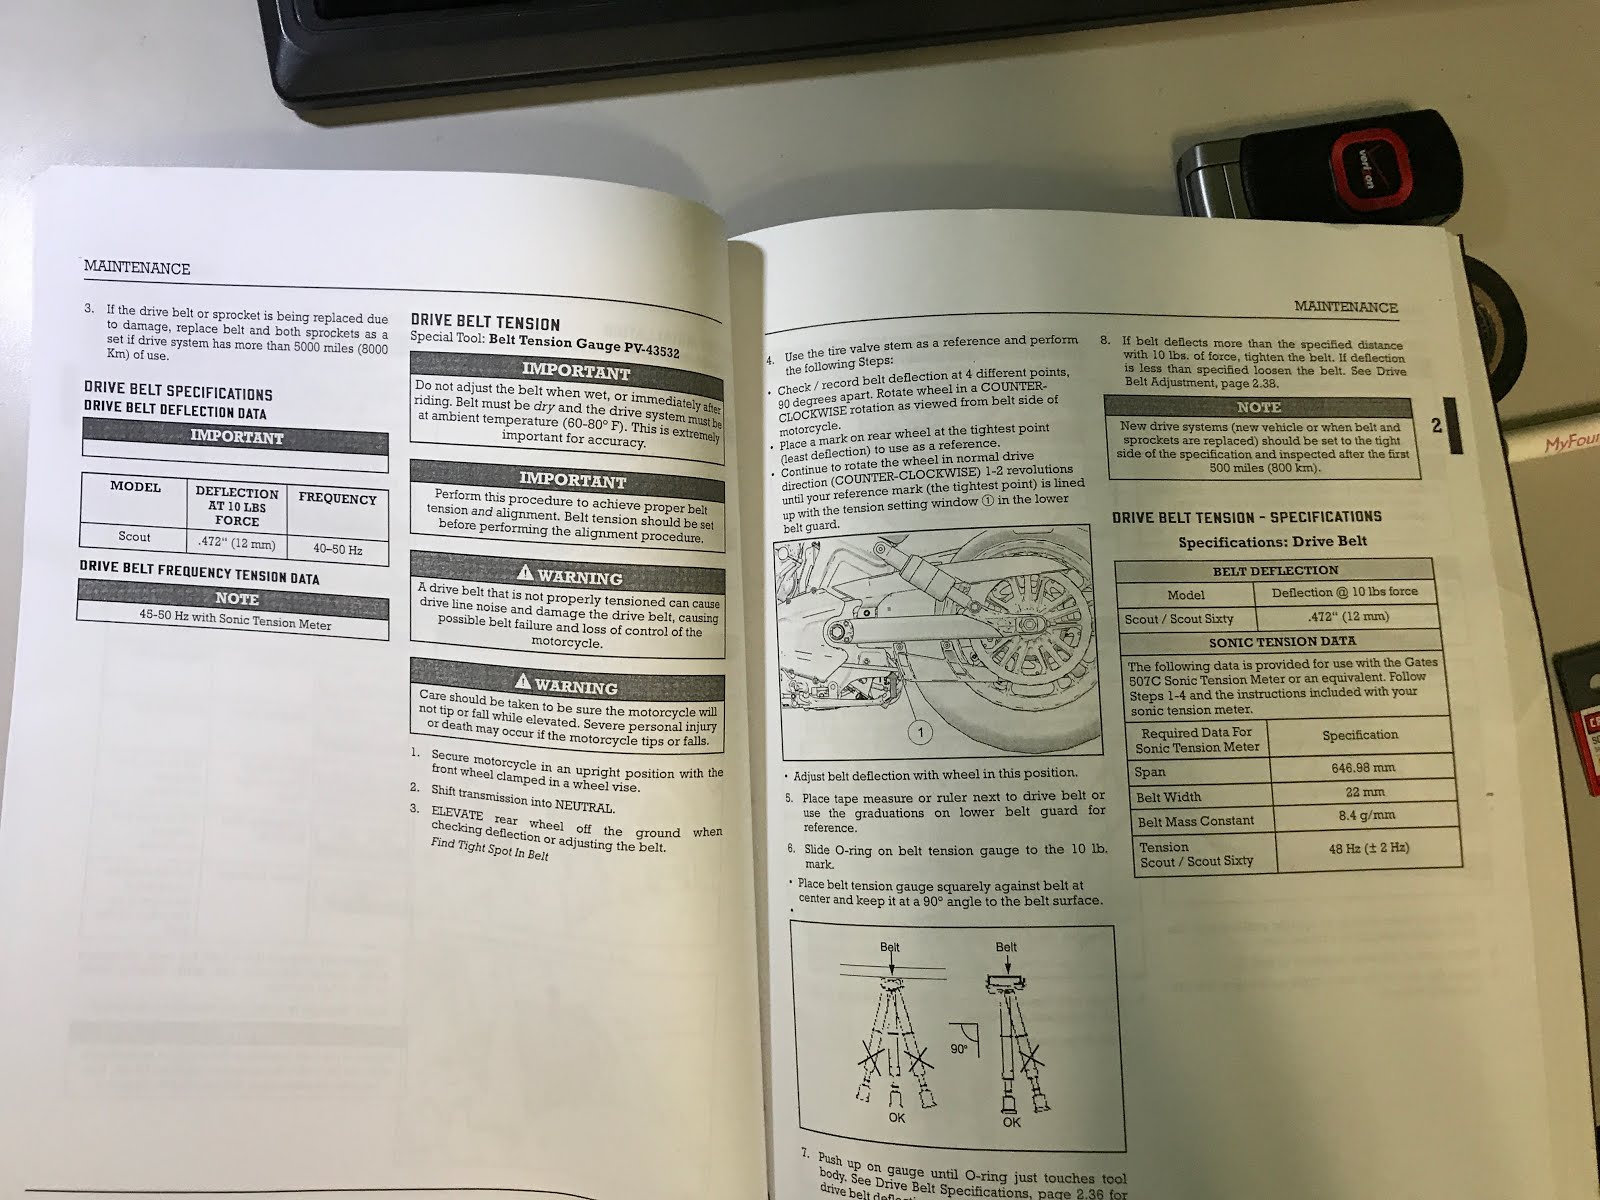
- Loosen rear axle
- Put bike on stand
- Tighten axle to 15 ft-lbs, as stated in the manual.
- Set tension to 12mm at 10lbs, using the axle bolt alignment on the side with the belt.
- (I found if you wiggle the rear tire and spin it in both directions, you can get the axle to "seat" tight to the alignment bolts, a key to get the belt to track correctly)
Now the hard part, getting the belt to track as recommended, which means the sides of the belt don't touch either side of the rear sprocket. Good luck, you'll set it be, it will look right but after you go for a drive you'll find that it tends to walk back to the outside! If anyone knows how to get this right and have it stay please let me know the trick.

Alignmentment:
Once you have the tension set and bike is on the stand and the axle is set to 15 ft-lbs use the right side adjuster to align. Turning the nut clockwise will move the belt to left, outside. Turning counter clockwise moves the belt to the right, inside edge. A belt that is centered, you can see the shiny belt track on both sides of the belt also aligns the rear axle! You will find this hard to do and the final position only takes very small rotations to move the belt! Like 1/16 turn!
Rear axle is torqued to 65 ft-lbs.
All those "I"nspection points -
Good luck there are lots of them. I did find that 3 of the 4 bolts that hold the handlebars to the forks were loose! One was out a full 1/4 inch. I'm guessing the person who assembled the bike at the dealer didn't torque these bolts! So be sure to look all bolts over!
Handlebar bolts:
22 ft-lbs, tighten bolts to front of bike first then rear 2 boltsShock preload:
Another item not set by the dealer for me. I drove 500 miles wondering why the bike bottomed out on the rear shocks. Yes, I'm heavy! The bike is rated to 428 lbs of rider and cargo capacity. I had to increase the preload by over a 1/2 inch. The ride was greatly improved aftwards. The adjust tool came with the bike.Manual says 282mm or 11.1 inches from shock bolt center, top to bottom bolts, when the bike is loaded. I found a nice way to make this adjustment by yourself. Don't bounce on the bike when loading it, just sit down slowly, let your weight push the shock springs.
The gauge I built, parts:
- I used 2 - 17mm x 1" 3/8 drive sockets, craftsman $4.59 each NOTE: Don't remove the tag on the 12 pt socket it makes a perfect holder for the rod to slide in and push the O ring when making a measurement
- A 1/8 metal rod, not aluminum has to hold a magnet, cut to 12.5 inches. $3.99
- A Neodymium magnet and the item packaged with the magnets $8.59, see images
- O ring, one that slides on 1/8" rod with light pressure. One that falls will not work nor one that is hard to move. I lightly oiled the rod where the Oring had to slide
- Ace Hardware items!
Home made shock preload gauge images:
 |
 |
| Notice the magnet holds the rod and rod holder such that the end of the rod is centered over the bolts center. THis is needed to get a accurate measurement. |
Parts:
 |
| Magnets, the black square was in the package and was easily cut to hold the rod. Cut so that the rod end is centered over the bolt for accurate measurement. |
 |
| Ace carrys craftsman now, I used one 6pt and one 12 point socket, this allowed me to get a square alignment for the rod. |
 |
| Top end, magnet holds the rod to socket |
 |
| Bottom end, note I used the plastic socket tag as a perfect insert for the rod to move in. I cut the tag and drilled a 3/16 hole.
Notes on gauge:
The manual calls for 282mm or 11.1 inches from bolt center when bike is loaded. This gauge lets you measure that distance by yourself. I taped the sockets to the shock mounts using blue painters tape, that held then nicely. When you sit on the bike: first mount the bike, then right it, then sit down slowly and lift feet briefly. The unmount bike and look to see where the O ring was pushed to. I marked my rod with a black permanent felt tip at the 282mm distance. I also lightly lubed the rod where the O ring had to slide, this worked great. You increase the spring tension to shorten the travel or loosen the spring tension to increase the distance. For me the O ring pushed past the mark by over 1/2 inch. I had to turn each spring nut a lot to get the preload out to 11.1 inches.
Moving the preload. I had to hold the spring and turn the nuts with the wrench in the other. I also marked each spring in one spot where a notch in the spring nut was so that I could keep track of turns. You'll find that when you turn one thing the other parts turn also, so unless you have a mark you won't know how much your really turned. Be sure and turn both shocks by the same amount!
Riding is fun, crashing sucks. Ride like every car is out to get you!
|
No comments:
Post a Comment